Setup an android phone as webcam on linux
Hello! My in-built laptop webcam has given up on me after 5 years. The capture quality of the webcam was pretty bad and any replacement for it would be of same quality,thus feeding my reluctance to replace it. But, I do need a webcam for occassional interviews and calls.
Any external webcam that I looked up online was obscenely expensive to me for what service and quality it would provide. It made me convince myself to settle with joining camera-on meetings on my android based mobile device.
This led me to the epiphany of figuring out how to use my android device as a webcam. It has a pretty good camera too, which would enable the interviewer watch me struggle with their questions in HD.
Turns out, it is a problem with well-documented solutions, using v4l2loopback. Following are my notes on suggested solutions and what I made for myself using those.
NOTE: While it shouldn’t be an issue with using other GNU/linux OSes and relatively modern android devices, always remember to check and verify compatibility at each step.
Requirements
Host:
v4l2loopback-dkms- A kernel module to create V4L2 loopback devices. This module allows you to create “virtual video devices”.android-tools- Foradbscrcpy- This application mirrors Android devices (video and audio) connected via USB or TCP/IP and allows control using the computer’s keyboard and mouse. Link
Android:
- Enable developer options and usb debugging on your android device.
Manual Steps
- Load the v4l2loopback module with module options
#  might need to use sudo. exclusive_caps for chrome/webRTC stuff (link below for details)
modprobe -v v4l2loopback video_nr=5 exclusive_caps=1 card_label="<YOUR DEVICE NICKNAME>"
- Check the created device
# Check if device is showing up as loopback device
v4l2-ctl --list-devices
# OR
find /dev/video5 # Here,video_nr=5
# OR
ls -1 /sys/devices/virtual/video4linux- With the device connected, run
scrcpywith the following configuration
# Choose camera between "front" and "back", choose, the device as v4l2 sink
# display-orientation used to record vertical, default is horizontal
# Add `--no-playback` to remove playback from scrcpy
scrcpy --video-source=camera --camera-size=1920x1080 --camera-facing=front --v4l2-sink=/dev/video5 --no-audio
You should now be able to select your phone’s set nickname as the video input in most software.
While these are the only steps, the module resets at boot, requiring setup every time. As such, automatic load of the module at boot would be better, reducing friction.
Auto load the module at boot
Setup 2 files at:
/etc/modprobe.d/v4l2loopback.confoptions v4l2loopback \ devices=1 \ video_nr=5 \ card_label="m55s" \ exclusive_caps=1/etc/modules-load.d/v4l2loopback.confv4l2loopback
sudo might be necessary for writing these 2 files to /etc
Now a loopback device should be setup at boot everytime, ready to use. Now, the only step necessary would be running scrcpy to start the connection.
While this is nice, its still is a bit of hassle - ensure to have all dependencies installed, ensure there is a loopback device, ensure adb server is up and a device is connected and remember or note the long scrcpy command for using it every time you want a webcam.
I would likely prefer an experience similar to plugging in any other USB webcam - plug and use. To achieve this, I went ahead and scripted a more “app-like” experience.
This is how it looks now whenever I plug in my android device:
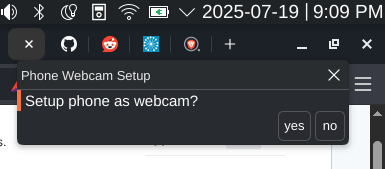
When clicked yes:
I mostly used shell scripting, udev rules and a systemd user service.
Udev
udev is a part of systemd, a common init system for linux based OSes. It is a device manager for the linux kernel,listening to changes from the kernel. It handles events such as plugging in and removal of hardware and makes it possible to write custom rules for performing operations on such events. For more details on how to write rules: Link
# live monitor what's being connected. Get the unique identifiers using this
udevadm monitor --property --udev

# This gives the device related info after android phone is connected
udevadm info --attribute-walk --name=/dev/android
Using the above commands I was able to find the identifying attributes of my android device and come up with this:
ACTION=="add", SUBSYSTEM=="usb", \
ATTR{idProduct}=="6860", ATTR{idVendor}=="04e8", \
TAG+="systemd", ENV{SYSTEMD_USER_WANTS}="android-cam.service"
It identifies whether my specific android device was plugged in and fires a systemd service
Systemd service
Most udev rules feature shell scripts with line RUN+=path/to/script.sh for running shell scripts. While this works in most cases, since the scripts run in root context, few things such as sending notifications using notify-send and launching scrcpy need workarounds and extra configuration. Digging for simpler solutions led to me configuring a systemd user service, which runs the configured script in logged-in user’s context giving access to GUI functionalities without the workarounds.
# cat ~/.config/systemd/user/android-cam.service
[Unit]
Description=Setup Android device as your webcam

[Service]
Type=oneshot
ExecStart=/home/sid/.local/bin/phone-webcam.sh
It is a one-shot user level service that fires once and executes the script mentioned in it to handle the rest.
The Shell Script
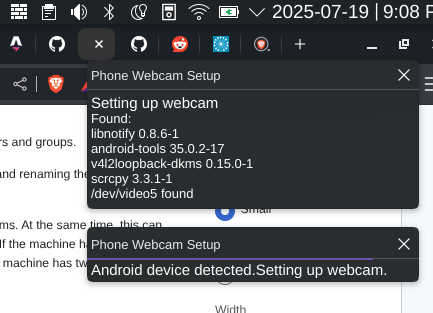
This took me the most time to figure out, but with this shell script, on each device plug-in, I get a notification for webcam setup consent. Once approved, it checks for all the dependencies needed, ensures loopback device is available, checks if android device is plugged and available, and finally sets up the device safely as an webcam.
#!/bin/env sh

set -e

DEVICE_PATH="/dev/video5"
TITLE="Phone Webcam Setup"

check_install() {
    BODY="Found: "
    for tool in "$@"; do
        if RESULT=$(pacman -Q "$tool" 2>/dev/null); then
          BODY+="\n$RESULT"
        else
          BODY+="\nerror: $tool not installed"
        fi
    done
    if [ -e "$DEVICE_PATH" ]; then
      BODY+="\n$DEVICE_PATH found"
    else
      BODY+="\nerror: $DEVICE_PATH not found.Please setup a loopback device"
    fi

    ERRORS=$(printf "$BODY" | grep -c "error:"|| printf "No errors found!")

    # BODY=""
    printf "$BODY"

    if [ "$ERRORS" -ne 0 ]; then
      printf "\n\nErrors found, exiting.\n"
      return 1;
    else
      notify-send -a "$TITLE" "Setting up webcam" "\n$BODY"
      return 0;
    fi
}

detect_device(){
  if ! adb devices | grep -wc "device"; then
    MSG="Android device not detected!"
    printf "$MSG"
    notify-send -a "$TITLE" "$MSG" || printf "notify-send failed"
    exit 1;
  else
    notify-send -a "$TITLE" "Android device detected.Setting up webcam."
  fi
}

VALUE=$(notify-send -u "critical" -a "$TITLE" "Setup phone as webcam?" -A "yes" -A "no")

if [ $VALUE -eq 0 ]; then
  check_install libnotify android-tools v4l2loopback-dkms scrcpy

  if detect_device ; then
    scrcpy --video-source=camera --camera-size=1920x1080 --camera-facing=front --v4l2-sink=$DEVICE_PATH  --no-playback
  fi
else
  notify-send -a "$TITLE" "Setup Declined, exiting."
  exit 0
fi
Closing thoughts
I am pretty satisfied with this setup. On the side, I had set an constraint to do it in one-sitting and not touch LLMs to hone the habit of figuring things out from docs. I managed to finish the exercise in one sitting, entirely by digging through the internet. Writing this note is taking more time. So far, the setup has been pretty stable and my video quality in calls have improved by a lot, without spending a dime on poor hardware.
Thanks for reading!
Additional Links
- https://github.com/v4l2loopback/v4l2loopback?tab=readme-ov-file#options
- https://github.com/Genymobile/scrcpy?tab=readme-ov-file#usage-examples
- https://wiki.archlinux.org/title/Udev
- https://wiki.archlinux.org/title/Kernel_module#Automatic_module_loading
- https://wiki.archlinux.org/title/V4l2loopback#Use_cases
- https://github.com/v4l2loopback/v4l2loopback#load-the-module-at-boot